-
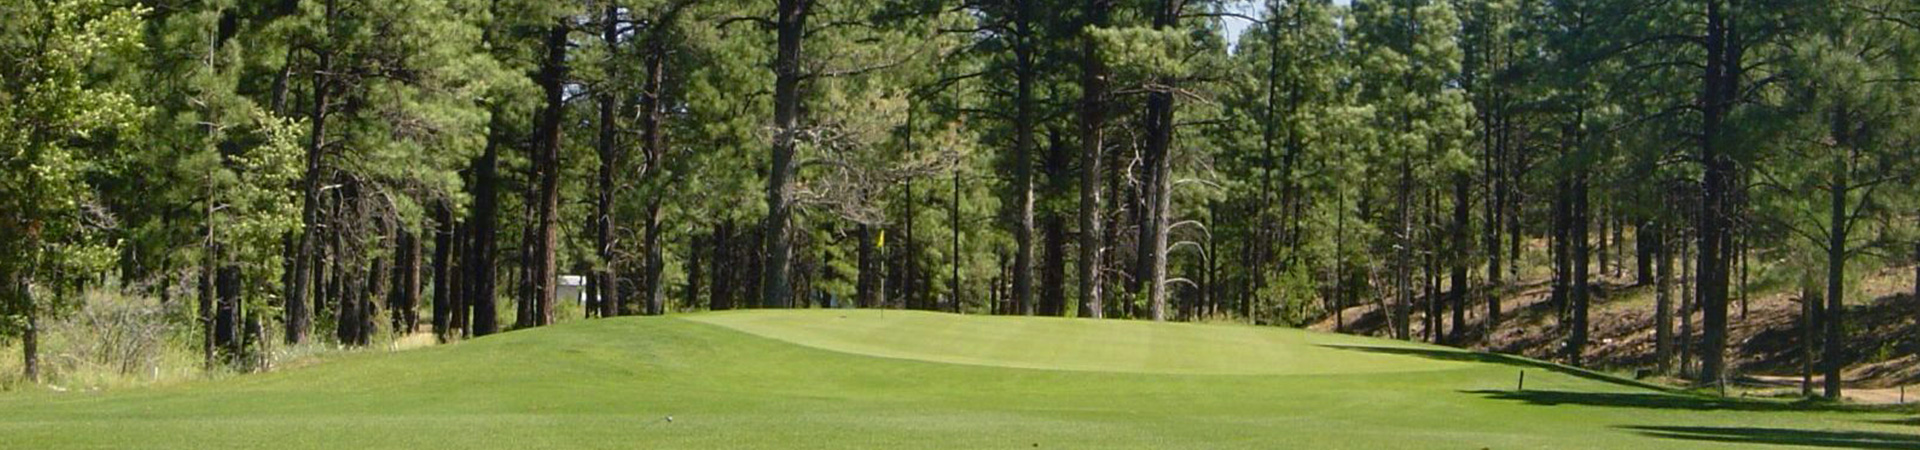
Hole #1
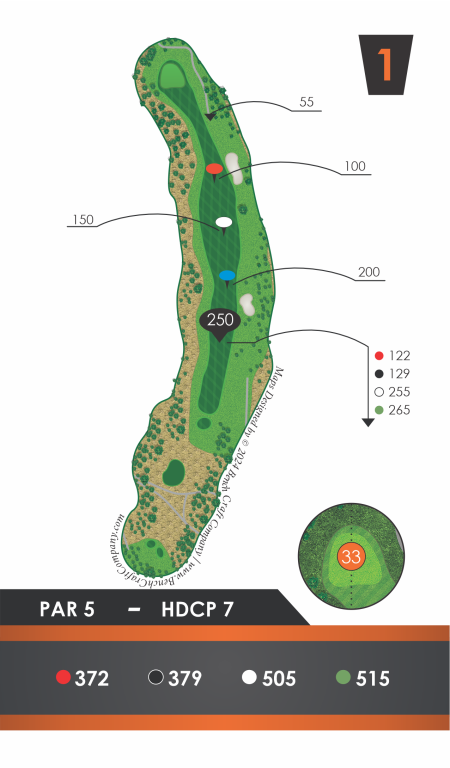
The tee shot from the Green & White tee Box will require you to carry 150 to 180 yards over a canyon to an elevated fairway. Your aim point should be towards the left of the bunker, 225 yards from the green. This gives you an opportunity to reach the green in two.
-
Hole #2
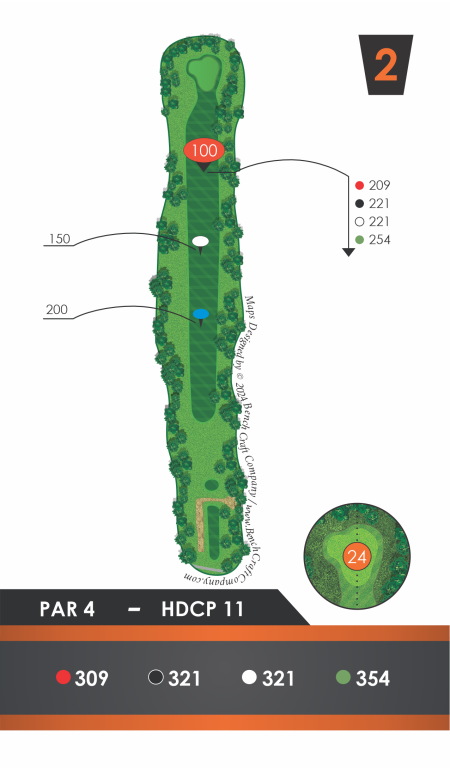
Nicknamed “The Bowling Alley,” its name is for the narrow 30-yard-wide fairway surrounded by trees. Be sure to put your ball on the same level as the flagstick on this two-tiered green; being above or below the hole can cause a three-putt for most players.
-
Hole #3
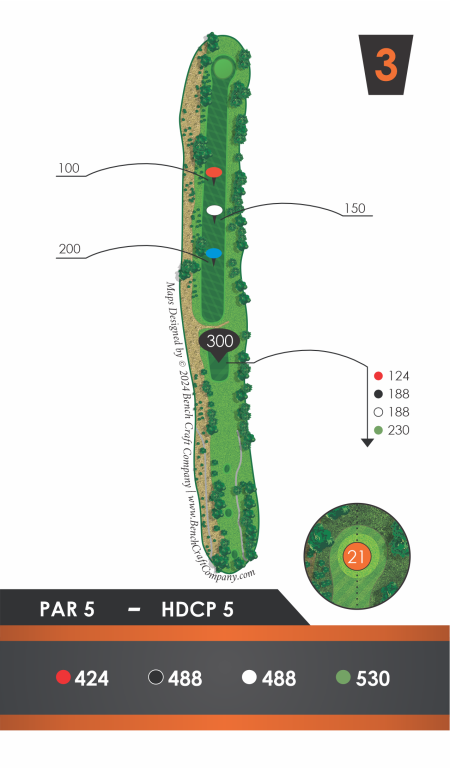
This par 5 is long and narrow and generally has a left-to-right crosswind. Aiming down the left side of the fairway is the best way to play it. Getting on the putting green in three is good, as players who 'go for it' are in high-risk territory.
-
Hole #4
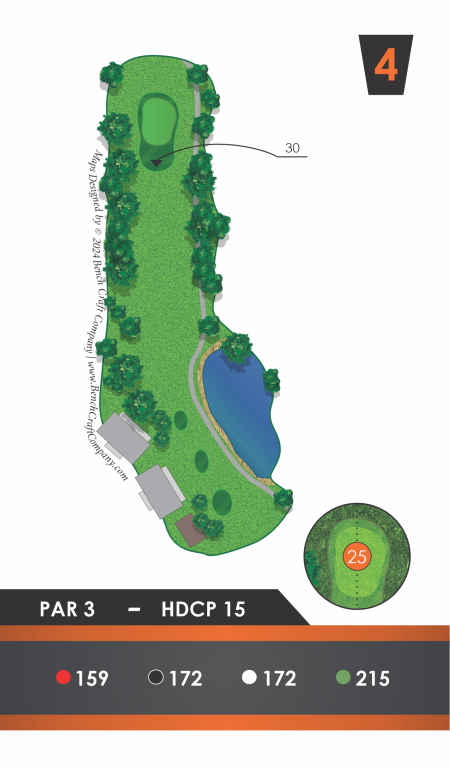
This is a tough par 3 hole. Once again, long or wide is trouble. The green is severely sloped back to front, so landing short is not the worst way to approach this hole. A two-putt par is a good score on this one.
-
Hole #5
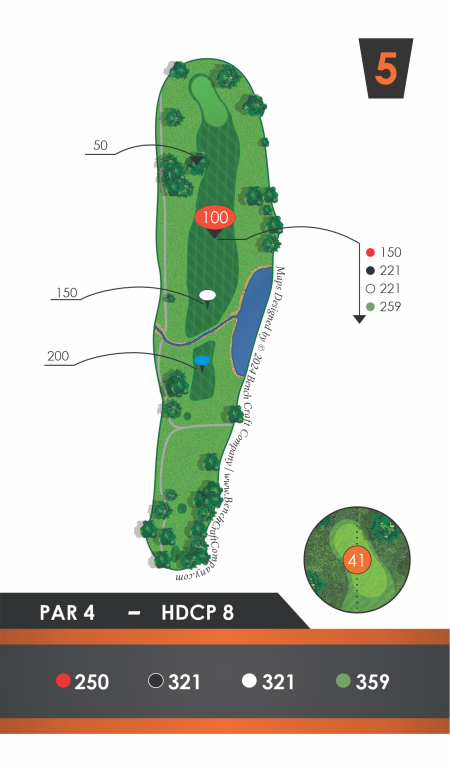
Lay back to your favorite yardage and just try to hit the fairway. Be cognizant of the water on the right; being too far left has trees guarding this massive green. This is a hard-to-reach back pin position, so give it all you've got should the flagstick be in the back.
-
Hole #6
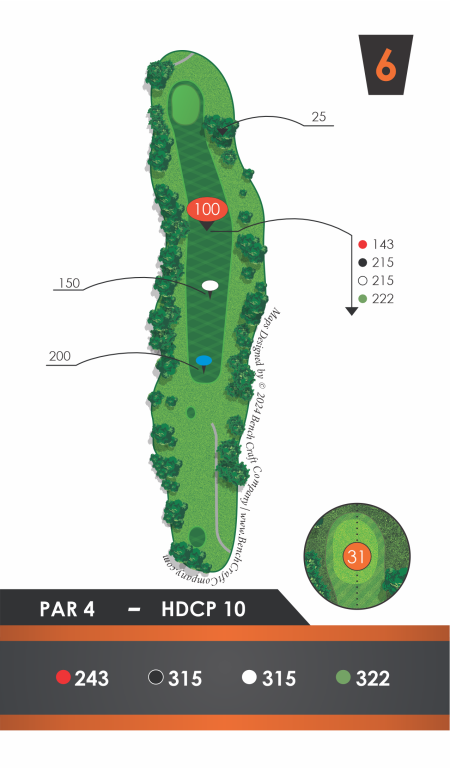
This drivable par 4 can give you trouble if your ball isn’t straight. It might be best if you lay back with a long iron or hybrid club to keep it in play. Being too far to the right of the green has tree trouble, and being too far left of the green has out-of-bounds potential.
-
Hole #7
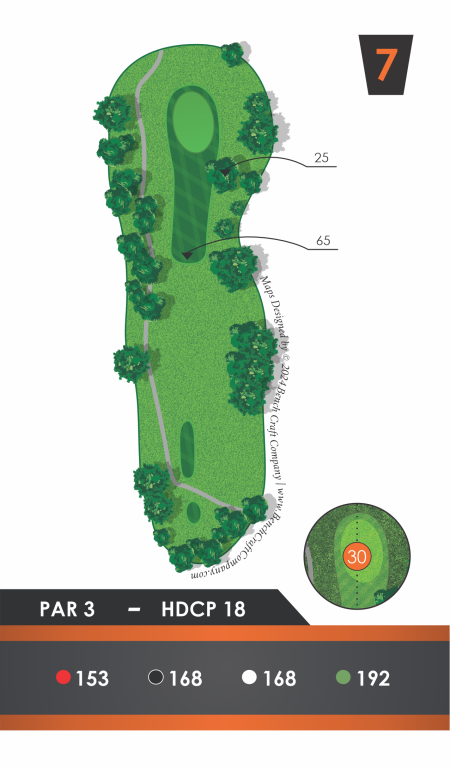
This par 3 has an elevated putting surface. If you are wide or long, the ball bounces away, making for a difficult pitch back to the cup. There’s plenty of room for a mishit on both sides of this par 3.
-
Hole #8
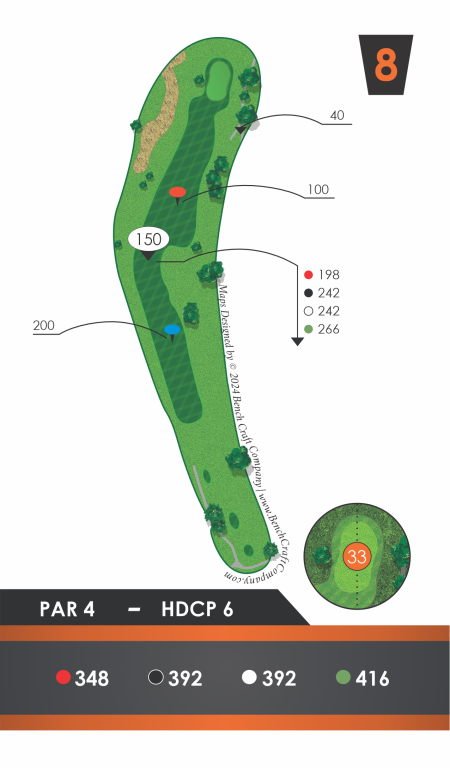
Play to the left with a small fade on this dogleg right. The ball will kick off the hill and receive some run downhill towards the green. Drop down a club for the approach shot, keeping in mind that it's downhill to the putting surface.
-
Hole #9
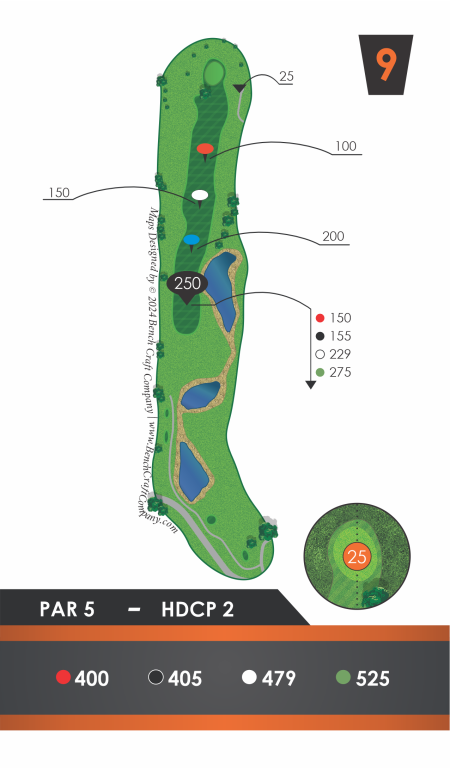
Driving the ball 200 yards is required to reach the fairway. Keep in mind this fairway slopes to the right, where water resides. Big hitters can get there in 2; just stay away from the big Pine in the front left of the green.
-
Hole #10
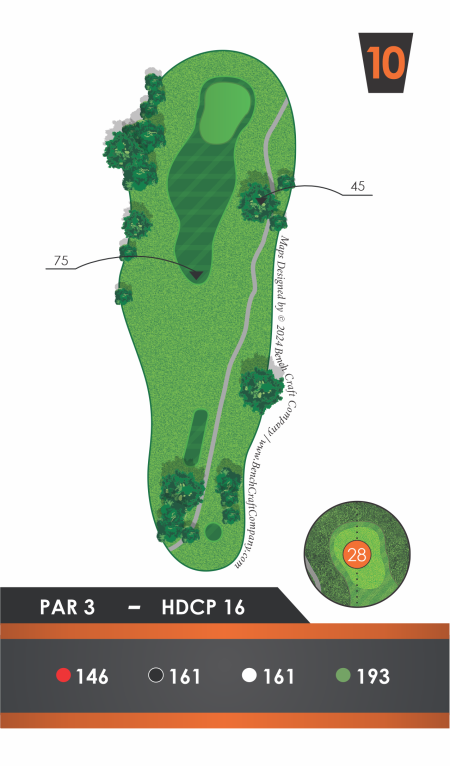
Typically, the wind will be straight at you so try a low-ball flight down and run it up and onto the green. Putting from below the hole is beneficial as this green has multiple slopes. Play it safe here or one can make a bogey and walk away shaking their head.
-
Hole #11
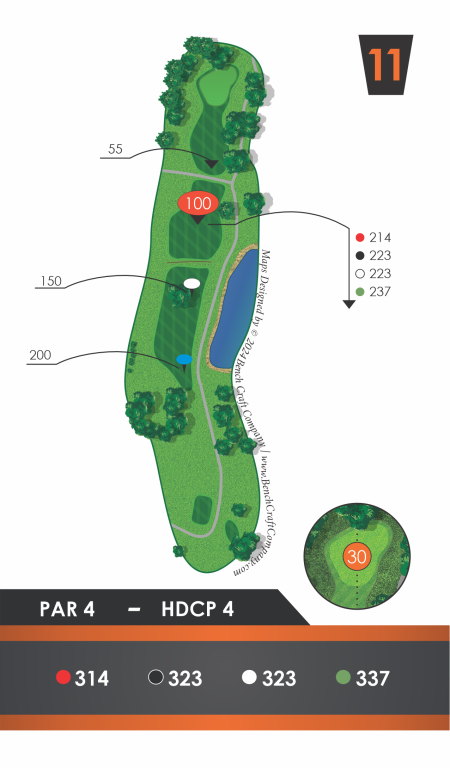
Out of Bounds is tight along both the right and left sides. A smooth 200-yard shot to carry the small ravine puts you in good shape to approach this green. Your second shot is uphill to a fast two-tiered green; a two-putt par is a welcome result.
-
Hole #12
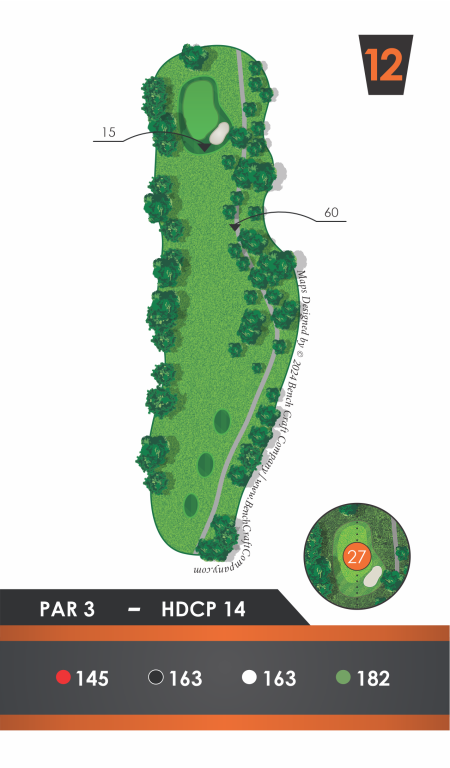
A downhill tee shot that feels like throwing a dart onto a dartboard. Out of Bounds is lurking left and right. Going over the green is not where a player wants to land. Club down and work with what you have; then happily take the two-putt par.
-
Hole #13
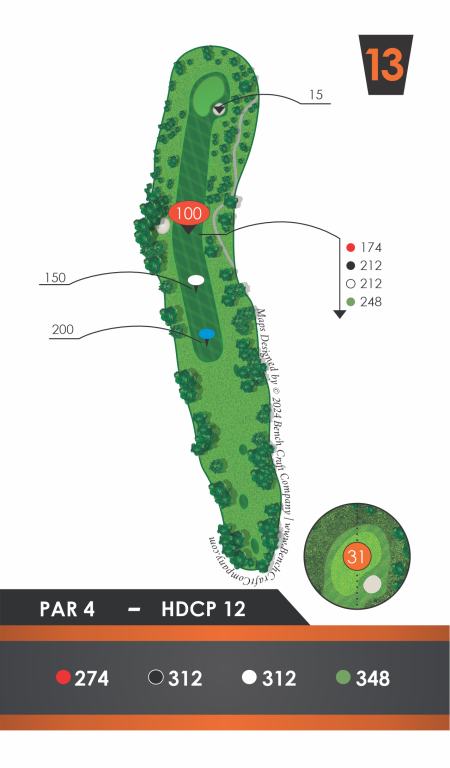
This short par 4 has a slight dogleg right. A good aiming point is at the bunker on the left side of the fairway. A fade off the tee should work out well. This will leave a short second shot into this bowl-like green.
-
Hole #14
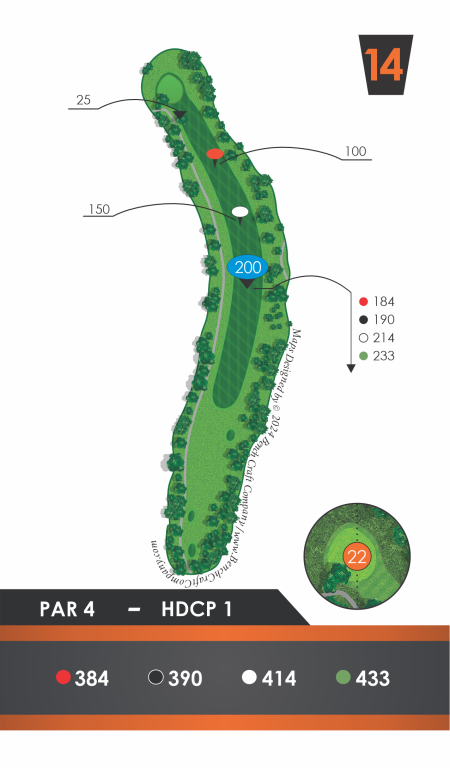
This is the toughest hole on the course. Your drive must be long and hug the right side to have a chance at the putting surface in two shots. Make sure to club down on your second shot due to the descent from 150 yards to the green. Going over can be a costly mistake.
-
Hole #15
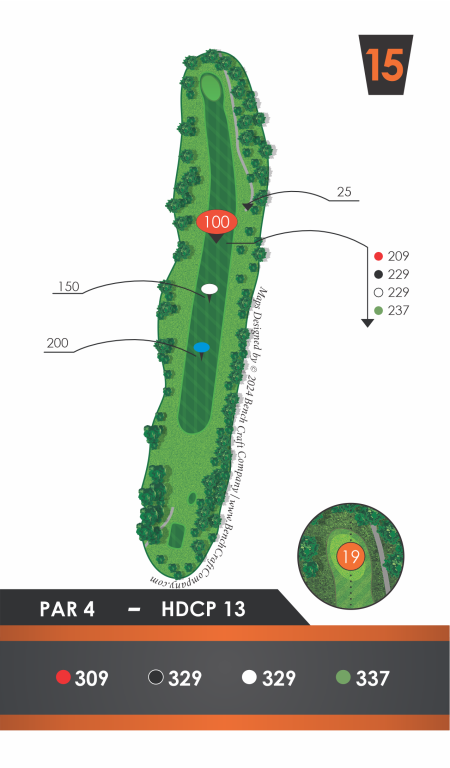
The hole appears easy from the tee box. A downhill, drivable par 4 with out of bounds on both sides. It’s a slight dogleg left with a small landing area. Landing the tee shot 100 yards from the green is the optimal place to approach this postage-stamp size of a green.
-
Hole #16
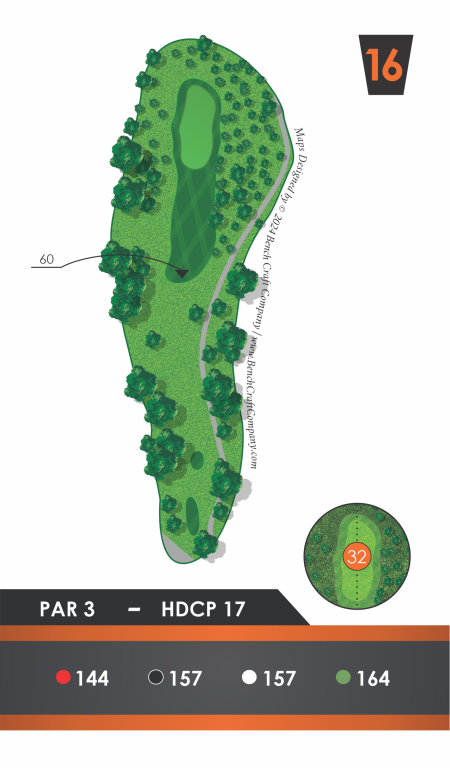
A narrow uphill par 3 that can be a good scoring hole if on the green in one shot. Clubbing up is recommended to reach the back parts of this green. Being short doesn’t hurt you if you can bump and run the ball close for an easy par.
-
Hole #17
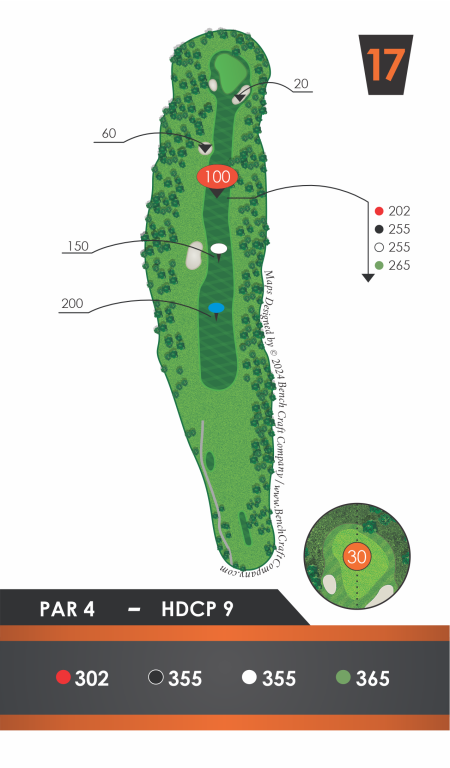
A straight drive will run a long way and leave a short pitch to a sneaky green. This picturesque hole is a great spot to snap a few pictures. A subtle break from the front right to the back left is apparent after you’ve putted a few times on this green.
-
Hole #18
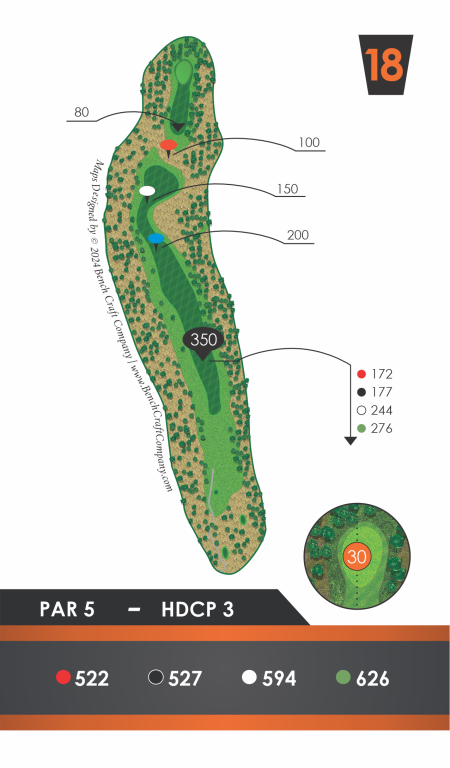
Given the name “Thunderbeast,” this signature hole gives people of all skill levels trouble. The goal off the tee is to avoid the right side, which makes the hole more difficult. A good drive on the left of the fairway will give you a 250-yard look at the green. If you decide to lay up, it’s a smooth 125-yard shot to a forgiving landing area; just don’t go long or you can land in a hazard, and we never want a penalty shot on your final hole.
Maps by Bench Craft Company: benchcraftcompany.com/products/course-guides/